Share with Zwift speed, cadence and incline while running on your treadmill
While you are running on your treadmill, Smart Treadmill app reads your current speed and cadence and the treadmill incline and broadcasts their values over BLE (Bluetooth Low Energy) to make them available to the most common fitness applications/games (like Zwift).
The calculation of the speed is based on the mobile phone’s magnetic field sensor. If we put the phone sideways on the chassis of the treadmill and glue a magnet on the belt of the treadmill so that, when the treadmill is in action, it passes very close to where the phone’s magnetometer is located (in phone’s upper part), the mobile phone will interact with the magnet in such a way as to be able to identify the speed of the treadmill belt. The detection of cadence and incline are based on the accelerometer sensor.
It is available also the new voice control mode, which allows you to set the speed and the incline to be broadcasted by speaking.
Once you’ve downloaded the app, open it and in the Help page you will find all the instructions to make it work.
Due to problems found on some specific phone models, we recommend that you purchase the Full Version only after testing the entire process (correct detection of the magnet, correct connection to Zwift).
Downloads
Google Play Store
You can download the app for free from Google play and and test that everything works well (magnet / voice detection, bluetooth connection) before purchasing it.
How It Works
1. Preparation
The application is based on the existence of a magnetic field sensor on each mobile phone. If we put the phone sideways on the chassis of the treadmill and glue a magnet on the belt of the treadmill so that, when the treadmill is in action, it passes very close to where the phone’s magnetometer is located (in its upper part), well… the mobile phone will interact with the magnet in such a way as to be able to identify the speed of the treadmill belt.
You need to get a small magnet, possibly circular and with a diameter no larger than 1 cm and a maximum thickness of 2 mm. The one shown in the image below is a 8 mm x 1.5 mm common Neodymium fridge magnet.
Then you have to glue the magnet to the treadmill belt, in a lateral position (no more than 5 cm from one of the sides of the belt, see the photos below for more information). It is recommended to use a strong as well as elastic glue: a drop of silicone glue is perfect.
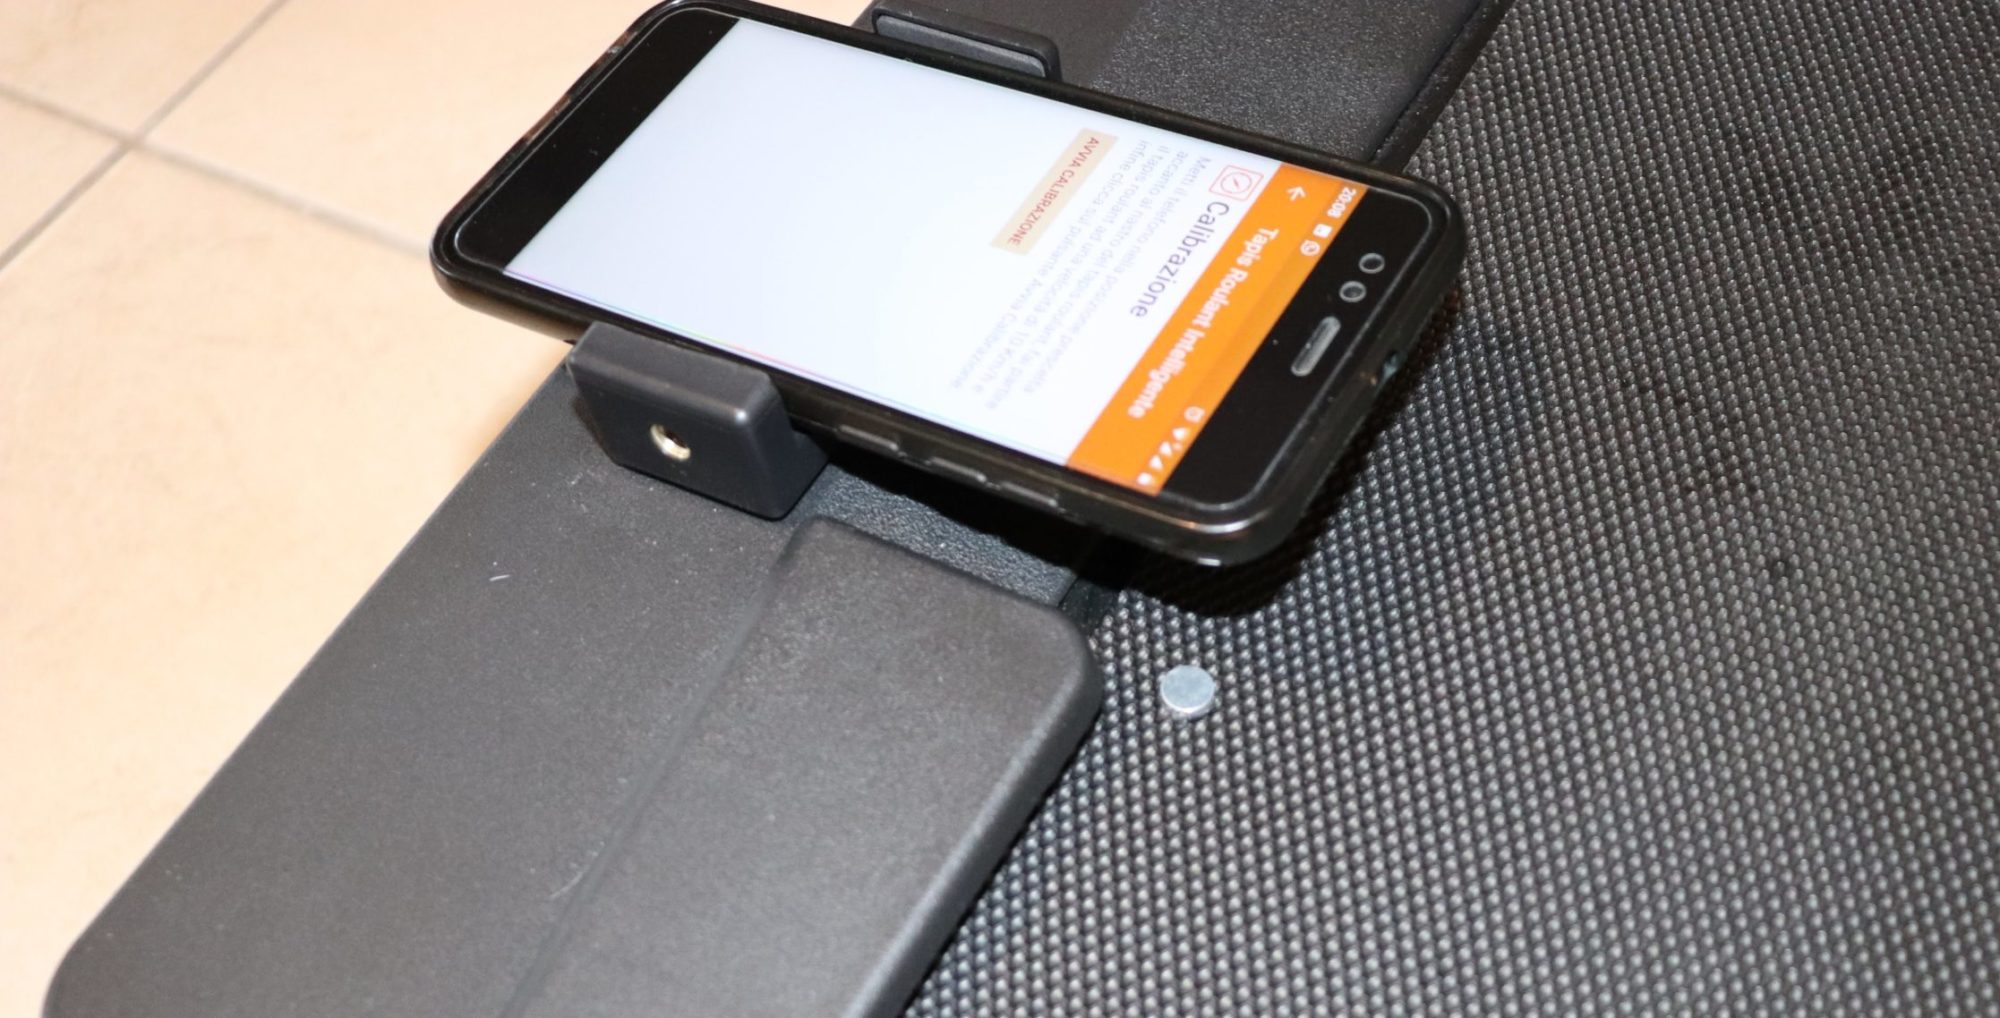
Now we need to find a suitable position on the treadmill in which to place your phone, so that the top of the phone is suspended on the side of the treadmill, and the magnet is to pass right under the mobile phone, about 3-4 cm away from it. A DIY approach is needed to complete the task.
Everything is set now! We just have to wait for the glue to dry, put your phone in the chosen position and start the calibration.
2. Application Menu
The application consists of 5 pages: “Start Service”, “Settings”, “Calibration”, “Help” and “Version Info”.
3. Calibration
Calibration is a needed phase the first time the service is used to determine the value of the two mandatory parameters for the service to work: the length of the treadmill belt (m) and the magnetic threshold value (μT). Either if you have already run the calibration once and you know the value of the parameters, or if you have made a manual measurement of the length of the treadmill’s belt, you can set these parameters directly on the Settings page and so skip the calibration phase. Anyway you can run the calibration anytime, even if you already know the values or you have already set them in the settings page.
To calibrate the service go to the Calibration page, put your phone in the chosen position next to the treadmill, start the treadmill to 10.0 Kph and then click on “Start Calibration” button.
While calibrating, a progress bar will show the progress of the calibration.
At the end of the calibration, the calculated values for treadmill belt length and magnetic threshold will be shown to the user, who will be able either to save the values (“Save and Exit” button), or calibrate again (“Restart Calibration” button) if anything went wrong.
4. Settings
In the Settings page you can set two primary parameters: Measuring System and Control Mode. If you choose “Voice” as Control Mode, you don’t need to indicate any extra parameter.
If you choose “Magnetic” as Control Mode, you can indicate three second level parameters: Threshold Value and Belt Length, for calculating the speed, and Orientation of the mobile phone smartphone compared to the treadmill orientation, for calculating the incline.
5. Service running in Magnetic Control Mode
Once the values for both mandatory parameters have been set, we are ready to run the service. The service will detect the proximity of the magnet to the sensor, and depending on the frequency of the detections, will try to calculate the speed of the treadmill belt. While calculating, the service will go through an Initialization phase, then a Start phase, and finally a stability phase, during which an “OK” will be shown as measurement status.
Now the service is working correctly, and the values of speed, cadence and incline are available for games based on bluetooth communication (like Zwift)!
It is possible that the service passes through the Initialization phase again, due to momentary lack of detection of the magnet by the sensor (which can also lead to an Error status). However, the service will continue to send the last calculated values for speed, cadence and incline.
Should the stability phase be interrupted too frequently, however, it is suggested either to re-calibrate the service, or to manually change the Threshold Value on the Settings page, bringing it to a higher or lower value.
6. Service running in Voice Control Mode
The service can be executed also in Voice control mode. To change the value of the speed broadcasted, the user will have to say “speed” (or “pace”), followed by the value to be set. It is also possible to change the value of the incline broadcasted, by saying “incline” and the incline value to set.